We all have computer files that we want to keep private from the rest of the world, but not everyone understands how to password protect a folder in Windows 10. You have the right to privacy, whether you’re hiding notes from someone who has access to your computer or (hopefully) something less drastic. Fortunately, in Windows 10, you can hide those lewd plans or files in a password-protected secret folder, and you can do so without purchasing any additional software. Here’s how to password protect a new folder in Windows 10 after you’ve created it. When it comes to privacy, you can never be too cautious.
How To Lock a Folder With a Password in Windows 10
Windows includes an encryption tool to prevent other users from opening your files, but for greater privacy, install a more robust third-party tool.
While there are several options, the simplest does not require any third-party software. This feature is built into Windows 10.
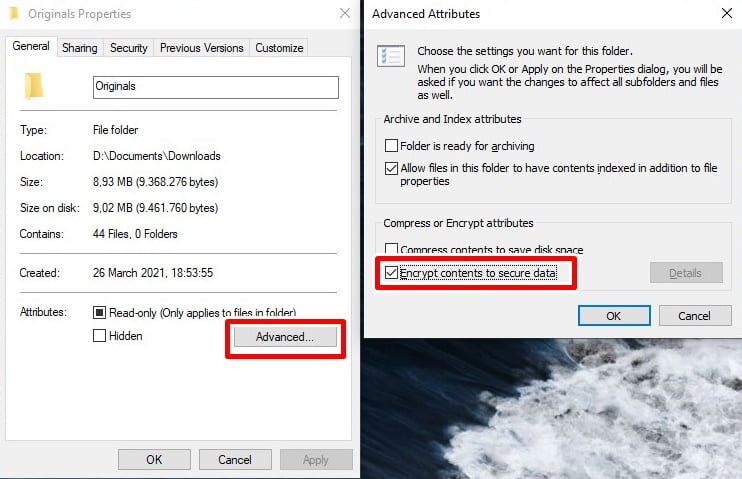
Step 1 – Select Properties from the context menu when you right-click the folder you want to lock.
Step 2 – At the bottom of the General tab, click Advanced.
Step 3 – Mark the box next to Encrypt contents to secure data.
Step 4 – To save, select OK, then OK again in the Properties window.

To avoid permanently losing access to your encrypted files, Windows will prompt you to back up your file encryption key. You can either follow those steps (continue reading) or ignore them.
Step 5 – If you followed the notification to back it up, select Back up now (recommended).

Step 6 – On the first screen, click Next to launch the Certificate Export Wizard.
Step 7 – Keep the defaults selected, and then click Next.

Step 8 – To enable the password, check the box next to Password and fill out the text fields below. Next should be selected.

Step 9 – Choose a location for the PFX file and give it a name.
Step 10 – Select Next to go over the information you provided, and then Finish to finish the export.

Step 11 – On the successful export prompt, click OK. If you need to use this certificate again, simply open it from the location where you saved it in step 9 and follow the on-screen prompts.
That’s all there is to it. We’ll remind you once more that this method isn’t intended for high-security purposes. It’s ideal, however, if you’re using a shared PC and simply want to keep some files inaccessible to other user accounts on the device. Just remember to lock your account (Win+L) whenever you walk away from the screen – otherwise, your files will be unencrypted the next time you login!


