It is so easy to find smartphones with great technology cameras. As a result, most of the time we will have photos that have large sizes. Besides, it has pros and cons. One of the pros is we can produce better quality photos, but our internal memory will run out quickly. Because the larger the size of the photo the more internal memory is used.
There are two solutions that you can apply to save your internal memory. First, delete the unimportant photos. Second, resize your photos to a smaller size. If you think it is hard to let your photos be deleted, you can go to the second option. For easier steps, I suggest you resize your photos through your MacBook. Now, the question is, do you know how to resize your photos through MacBook? If you don’t, you are now in the right place.
Quick-Step
Open Finder > Find the photo > Select photo > Press Control + click > Open With > Click Tools on Menubar> Adjust size > Adjust the Resolution > OK
Resizing Your Photos Using Built-in Feature in MacBook
Well, I am going to show you How to Resize Any Photo on Your Mac or MacBook step by step.
1. First, press the Command + Space keys.
2. Type ‘Finder‘, then hit Enter key.
3. Find the photo that you want to resize.
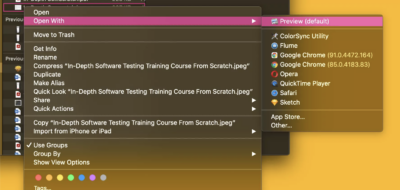
4. After you found the photo, place the pointer to it, then press Control + Click.
5. On the options, click Open With.
6. Click Preview on the expanded menus.

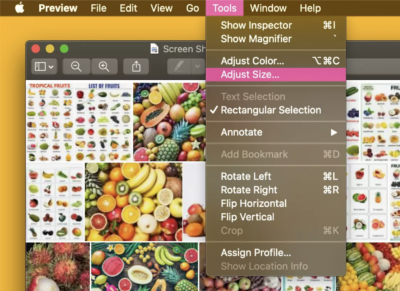
7. Now, after the photo has opened, click the Tools menu on the Menubar.
8. After that, choose to Adjust Size.

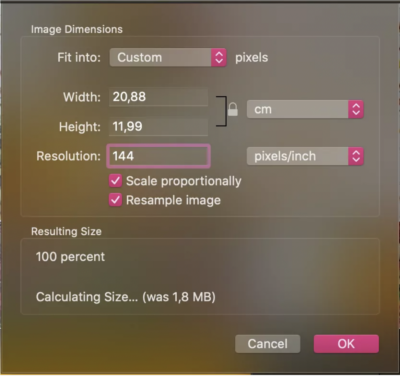
9. Change the number of Resolution handles on the Image Dimension section to a smaller number.

10. After you find the best photo file size in the Resulting Size section, click the OK button.
11. Now, your photo is already resized successfully.
That’s it. If you find this article useful, kindly share it with your friends that you think they need it most. If there is any question or difficulties related to MacBook usage, kindly ask it out through the comment section below. I would be happy to answer it for you.
Last, stay safe, stay healthy, and see you. :))
FAQs
Q: Which macOS versions are supported?
A: This guide is applicable to macOS versions 10.14 Mojave and later, including macOS Catalina, Big Sur, and Monterey.
Q: What tools can I use to resize photos on my Mac or MacBook?
A: You can use built-in macOS tools like Preview, as well as third-party applications like GIMP, Pixelmator, and Adobe Photoshop.
Q: Can I resize multiple photos at once using macOS?
A: Yes, you can use the Automator app to create a workflow that resizes multiple photos simultaneously. Choose “New Document,” select “Workflow,” add “Get Specified Finder Items” and “Scale Images” actions, and set the desired size.
Q: What are the best image formats to use for resizing photos?
A: The most common formats are JPEG, PNG, and TIFF. JPEG is best for photos with a lot of colors and detail, while PNG is suitable for images with transparency or less detail. TIFF is a lossless format that preserves image quality but has larger file sizes.
Q: How can I maintain the aspect ratio when resizing a photo?
A: To maintain the aspect ratio, make sure to lock the aspect ratio or enable the “constrain proportions” option in the resizing tool you’re using.
Q: Will resizing a photo affect its quality?
A: When increasing the size of a photo, the quality may decrease as the software interpolates additional pixels. When reducing the size, some detail may be lost, but the overall quality should remain acceptable. To maintain quality, consider using lossless formats like TIFF or high-quality compression settings for JPEG and PNG.
Q: How do I undo the resizing if I’m not happy with the result?
A: Most applications, including Preview, offer the option to undo your last action by clicking “Edit” and then “Undo” in the menu bar. To avoid losing your original photo, always save a copy of the resized image as a new file instead of overwriting the original.


