When it comes to working with a word processor, it is undeniable that Office Word is a critical tool for both office and academic or homework. As a result, it is frequently used in collaborative teamwork, so that different users can write and edit a specific document. This can be a problem if another user edits content that we do not want to be changed.
In this case, we should be aware that Microsoft Word includes functions that allow us to protect any document so that it cannot be edited by others. We can limit the changes in this way by limiting the available format options or the areas that can be edited. Similarly, the Windows Rights Management Service (RMS) can be used to restrict the edition of the document based on the user account.
How to Protect Your Word Document
Microsoft Word’s most recent versions provide several options for document security, including read-only mode, password protection, editing restrictions, and digital signatures. You can also mark a document as final to let others know it hasn’t been changed since you last saved it. This is how to do it:
Read-Only Mode
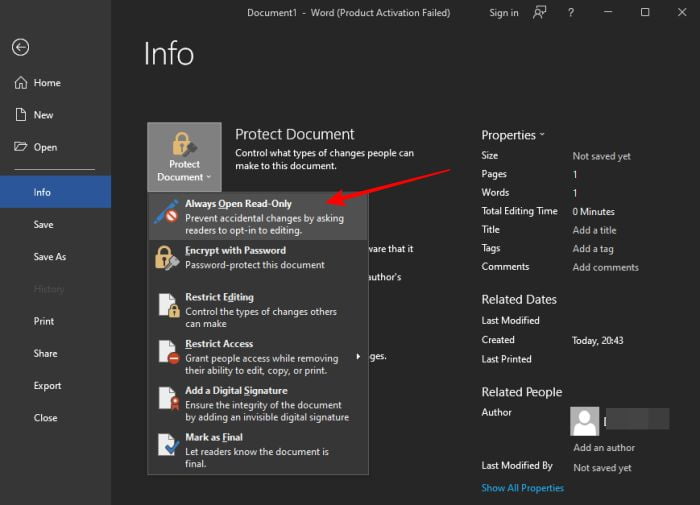
You can prevent others from editing a document by making it read-only. To view your security options, go to File > Info > Protect Document. Select Always Open Read-Only from the Protect Document menu. Simply save the document, close it, and reopen it.

Word displays a message informing you that the author prefers you open this as read-only unless you need to make changes. To open the document in read-only mode, select Yes. Of course, anyone can refuse and open the file in edit mode. The goal is to make it easier for people to open the document as read-only to reduce the possibility of unintended changes.
To remove the read-only restriction, open the document in edit mode. Click the File menu, go to Info > Protect Document > Always Open Read-Only.
Password Encryption
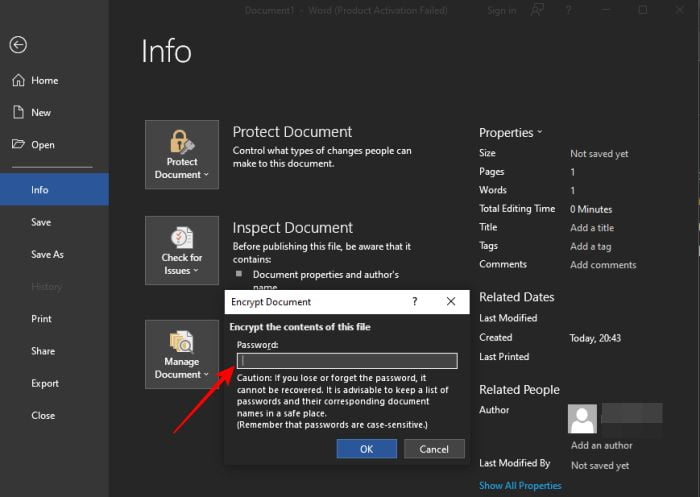
Encrypting a document with a password is possible by going to File > Info > Protect Document and selecting the Encrypt with Password option. Word will ask you to enter a password for the document. Because there is no way to retrieve or reset the code if you forget it, use a complex but memorable password.

Now save the document, close it, and reopen it, and Word will prompt you (and anyone else) to enter a password to access it.
To remove the password, go to the File menu, select Info, and then select Protect Document, followed by Encrypt with Password. You will see a pop-up window where you can delete the obscured password, then click OK. If you save and close the document, you will not be prompted for a password the next time you open it.
Restrict Format Editing
You can restrict how your document can be edited. Select Restrict Editing from the File > Info > Protect Document menu. Your document will then display a Restrict Editing pane on the right-hand side for formatting and editing restrictions. You can grant people permission to read your document, select which sections they can edit, and specify how they do so.

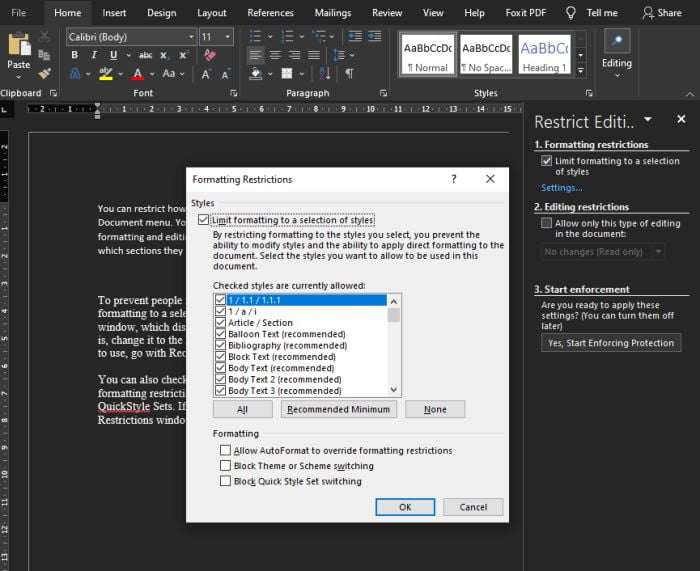
To prevent people from changing the formatting of your document, check the box next to “Limit formatting to a selection of styles.” Click Settings to bring up the Formatting Restrictions pop-up window, which displays all of the style changes that are permitted by default. You can leave it as is, change it to the Recommended Minimum, or remove it entirely. If you’re unsure which setting to use, go with Recommended Minimum.
You can also check any of the three Formatting options to Allow AutoFormat to override formatting restrictions, prevent switching themes or schemes, and prevent switching QuickStyle Sets. If you’re not sure, uncheck these three options. To close the Formatting Restrictions window, click OK.
Restrict Content Editing
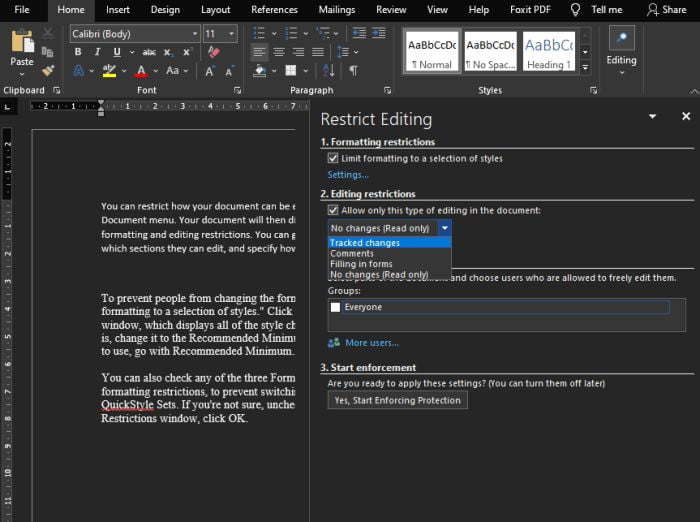
Check the box next to “Allow only this type of editing in the document” under Editing Restrictions to specify how readers can change the content in the document. Click the drop-down menu to the right to select one of four options:
- Tracked changes activate Track Changes in the document and disable all other types of editing.
- Comments allow readers to leave comments in your document without modifying it.
- Filling in forms allows readers to fill out forms you’ve created but not change the content.
- No changes (Read-only) place your document in read-only mode, preventing any changes from being made.

Mark as Final
You can still mark the document as final in an unofficial manner if you do not use a digital signature. Select Mark as Final from the File > Info > Protect Document menu. Word will notify you that the document has reached its conclusion and will be saved. When you mark a document as Final, you disable typing, editing, and proofing capabilities, and any reader will see a message indicating that the document has been finalized.

When a user opens the document, a message at the top of the screen informs them of the file’s status. However, by clicking the Edit Anyway button, a reader can still make changes to the document. When they click that button, they will be able to edit and resave the document.
This option’s ultimate goal is not to prevent anyone from editing the document, but to inform readers that it is the recommended final version. If someone wants to continue editing the document, their actions will be recorded. When a document is marked as Final and then edited again, the original author is still shown as the author, while the other person is saved as the person who last modified the document.
I hope this has opened your eyes, given you some ideas, and made you aware of how vulnerable you may be, but it has also given you hope and some measures you can take to protect yourself.


