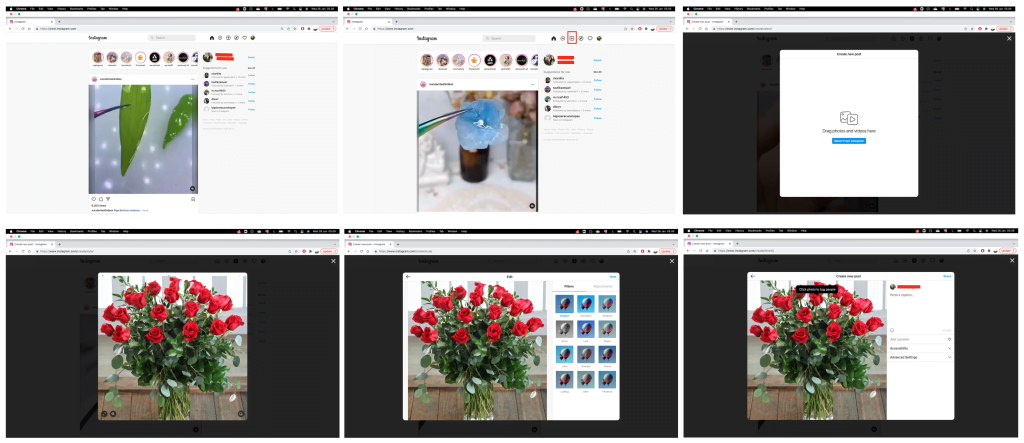
How to Upload Photos to Instagram from Mac or MacBook — It is very common to upload photos to Instagram on smartphones both in Android and also iOS. How about if we do the same thing on our mac or MacBook? Well, it is absolutely possible to do. So, if the photos that you want to upload are saved on the local storage of your Mac or MacBook, you don’t need to move them to your smartphone first. The way in uploading the photos is quite similar if we compare it to the upload steps on smartphones. For the detailed explanation related to it, let’s move to the next paragraph.
How to Upload Photos to Instagram from Mac or MacBook
Here are the steps of How to Upload Photos to Instagram from Mac or MacBook for you to follow:
- Launch Chrome browser on your Mac or MacBook.
- Visit instagram.com
- Then, log in using your instagram account credential.
- After that, clickk the + button.
- On the pop-up appeared, click Select From Computer.
- Find the picture that you want to upload from your computer.
- Once it is found, click twice.
- Click the Next button on top-right corner of the pop-up.
- Select the filter, or click Adjustments to be applied to your photo.
- When you are done editing your photo, click Next button.
- Fill the caption field with words you prefer. You can also tag someone too.
- Last, click the Share button.

Well, this is the last section of the tutorial. I hope you find this tutorial useful. Let your family and friends know about this article. So they can upload any photos they like to their Instagram account through Mac or MacBook.
Let me know in the comment section below if you found any difficulties in following the steps, or if you have any questions that are related to the topic that is being discussed, I will be happy to answer and help you out.
Thanks a lot for visiting nimblehand.com. As the pandemic hasn’t ended yet, please keep yourself safe and healthy. See you in the next article. Bye 😀


